
Looking for dinner ideas for two?
Sometimes the problem isn’t cooking for a big family, sometimes, the problem is cooking for two, and finding great recipes that are perfect for that.
These dinners are perfect for a romantic dinner plan (think Valentine’s Day), quick dinner meals that are filling and healthy, or even meal prep dinners that you can prepare ahead of time for the both of you.
That way you have less food waste and leftovers that inevitably go bad before you get a chance to eat them. The secret is in making deliberate portions so as to not make too much.
Let’s face it, sometimes you simply don’t want to spend loads of time in the kitchen, but you still want to whip up something good.
Related: 53 Quick And Easy Meal Ideas That Are Perfect For Weeknights
And you can totally do that. You just need a few of your favorite ingredients, a little bit of patience, and some hungry taste buds. For a lot of these recipes, having a reliable crock pot helps a ton
33 dinner ideas for two: Here’s what you should make for dinner tonight—
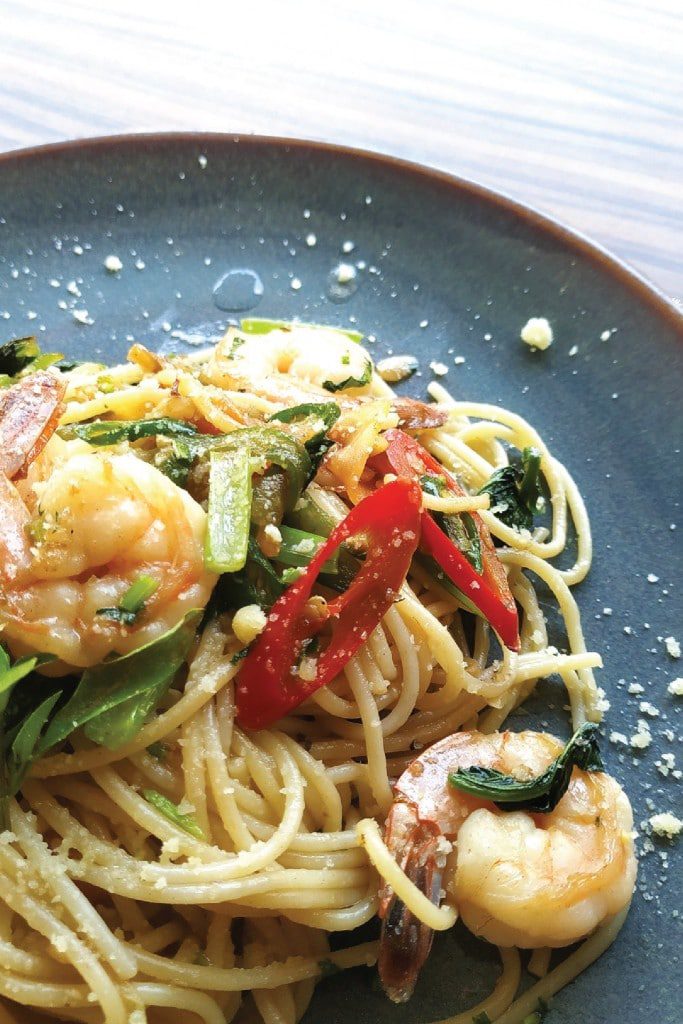
Spaghetti Carbonara
Via Teal Notes
Spaghetti Carbonara (A Symphony of Flavors in Every Bite)
Ingredients
- 8 ounces spaghetti
- 4 ounces pancetta or bacon, diced
- 2 cloves garlic, minced
- 2 large eggs
- 1 cup grated Parmesan cheese
- 1/4 cup chopped fresh parsley
- Salt and pepper, to taste
Instructions
- Start by bringing a large pot of salted water to a rolling boil. Add the spaghetti and cook it until it reaches the perfect al dente texture.
- While the pasta is cooking, heat a large skillet over medium heat. Add the pancetta or bacon, and cook it until it turns crispy and releases its flavorful fat. Stir occasionally to ensure even cooking.
- In a separate bowl, whisk together the whole eggs, additional egg yolks, grated Parmesan cheese, and a generous amount of freshly ground black pepper. Beat the mixture until it becomes smooth and well combined.
- Once the pasta is cooked, drain it well, reserving a small amount of the cooking water.Immediately transfer the hot pasta to the skillet with the cooked pancetta or bacon. Toss the pasta and pancetta together, allowing the flavors to meld.
- Divide the pasta into individual serving bowls or plates, making sure to distribute the pancetta or bacon evenly. Drizzle any remaining sauce from the skillet over the pasta.For an extra touch of indulgence, I like to sprinkle some additional grated Parmesan cheese and a sprinkle of freshly ground black pepper on top.
Try to whip up some spaghetti with something other than plain old tomato sauce. This is especially great if you two are cheese lovers and like to play it up with some bacon. To compete it you can make it with a salad or eat it solo. Either way it’s a dinner idea for two that can definitely stand on it’s own two feet in terms of taste and satisfaction. It also makes a tasty meal plan idea for the week!
Lemon Chicken Piccata
Lemon chicken is the absolute best, and it doesn’t always have to be grilled. You can make some finger licking lemon chicken in a matter of a few minutes with a few simple ingredients. An accompanying ingredient that would go great with this? How about a few cups of healthy brown rice seasoned to perfection for the two of you?
Related: 23 Healthy Snack Ideas For Work
Bell Pepper Pizza
Via Teal Notes
Who says pizza can only be good on dough? If you’re looking for a healthy recipe then this one is for you! Try these colorful bell pepper pizzas and create a dinner both of you (and your body) will appreciate.
Bell Pepper Pizza (Healthy Food Never Tasted So Good!)
Ingredients
- 4 large bell peppers (any color)
- 1 cup pizza sauce
- 1 1/2 cups shredded mozzarella cheese
- 1/2 cup sliced pepperoni (optional)
- 1/4 cup sliced black olives
- 1/4 cup sliced mushrooms
- Fresh basil leaves, for garnish
- Salt and pepper, to taste
Instructions
- Preheat your oven to 400°F (200°C) and line a baking sheet with parchment paper.
- Preheat your oven to 400°F (200°C) and line a baking sheet with parchment paper.Wash the bell peppers thoroughly and pat them dry. Slice each bell pepper in half vertically, creating boat-like shapes.
- Remove the seeds and white pith from the bell pepper halves, creating hollow cavities to hold the toppings.
- Place the bell pepper halves on the prepared baking sheet, and cut side up.
- Spoon a generous amount of pizza sauce into each bell pepper half, spreading it evenly.
- Sprinkle a layer of cheese over the sauce. Feel free to add as much cheese as you prefer!
- Now it's time to add your favorite toppings. Get creative and personalize your pizzas. Add sliced pepperoni, sautéed mushrooms, diced onions, black olives, or any other toppings you love.
- Once you've added your desired toppings, sprinkle another layer of cheese on top to hold everything together.
- Place the baking sheet with the bell pepper pizzas in the preheated oven.
- Bake for approximately 15-20 minutes or until the cheese is melted and bubbly, and the bell peppers have slightly softened.
- Remove from the oven and let the pizzas cool for a few minutes before serving.
Related: 35+ Cheap Budget Friendly Meals To Feed The Family
Pork Carnitas Tacos (Slow Cooker Tacos)

Via Teal Notes
Now, you’re wanting tacos but you aren’t quite sure that you want to go out to get them. No problem! Just make your own version in your own slow cooker at home!
Not to worry, you don’t have to figure out how to make pork tacos for two in your spare time, you can just follow the recipe and come up with some seriously flavorful stuff.
Pork Carnitas Tacos (Slow Cooker Pork Tacos)
Ingredients
- 3-4 lbs Pork shoulder roast
- 15 oz Can of pineapple chunks
- 1 tbsp Hoisin or soy sauce
- 4 Cloves of minced garlic
- 2 Jalapenos, sliced thin
- 2 tsp Pepper
- 1 tbsp Salt
- 3 tbsp Honey
Instructions
- Put all ingredients into the slow cooker and cook on high for 3-4 hours or until falling apart.
- Shred the meat with a fork, add salt & pepper as needed.
- Brown 6 inch flour tortillas.
- Top with pulled pork, pepper slaw, lettuce, tomatoes, sliced jalapenos, yogurt dressing, and fresh cilantro.
Notes
One Pan Orzo With Sausage And Peppers

Via Teal Notes
If you’re craving something like lasagna but don’t want to go through the trouble of actually making it (since it can be SO involved) try making some one pan orzo instead. It is downright delicious and it doesn’t take too much effort to make at all.
Plus you’ll have leftovers that’ll still be great to eat later. It’s a win-win dinner for two recipe!
Cheesy Orzo With Sausage And Peppers
Ingredients
- 2 tbsp Olive oil
- 1/2 Onion, sliced
- 12-15 oz Kielbasa sausage or a similar sausage, cut into 1-2 inch pieces
- 1 Red pepper, sliced
- 1 Yellow pepper, sliced
- 1 Green pepper, sliced
- 1 cup Orzo, uncooked
- 3 Cloves of garlic, minced
- 2 cups Chicken broth. with an additional 1 cup handy
- 15 oz Can diced tomatoes, undrained
- 11/2 tbsp Cajun seasoning
- 1 cup Fresh parmesan cheese
- 1/2 cup Fresh parsley, chopped
- Salt and pepper, as needed
Instructions
- 1. Heat olive oil on med-high, add onions and sausage and saute for 3 minutes or until fragrant. 2. Add the peppers, orzo, and garlic. Saute on med-high for 2-3 minutes or until the peppers have softened slightly, the sausage is browned, and the garlic is fragrant. 3. Add the chicken broth, diced tomatoes, and cajun seasoning. Stir well. Cover and simmer on medium for 20-30 minutes, stirring often. It may be necessary to add additional chicken broth if the pasta begins sticking. Add ¼ cup more at a time, if needed. 4. When the orzo is cooked, stir in the cheese and fresh parsley. Check to see if additional salt and pepper is needed. 5. Serve warm.
Notes
Related: Cheap Meal Ideas: What Is The Cheapest Meal To Make?
Seared Salmon With Wild Rice
While salmon and wild rice can seem like a fancy plate, you can absolutely make this at home in just a few steps. Not only is it good, but it can be a nice break from your usual dinner routine as you play it up a bit for some salmon. Not to mention it also makes a great dinner idea for two on Valentine’s Day.
20 Minute Steak Fajitas
Via Teal Notes
It’s safe to say steak fajitas are a general favorite, and luckily you don’t have to visit your local mexican restaurant to get a taste of some mexican goodness. You can whip up steak fajitas for two and call it a day! The sauce on top looks like its definitely a plate you won’t want to put down.
Speedy And Savory 20-Minute Steak Fajitas
Ingredients
- 1 lb flank steak, thinly sliced
- 1 red bell pepper, sliced
- 1 green bell pepper, sliced
- 1 yellow bell pepper, sliced
- 1 onion, sliced
- 2 cloves garlic, minced
- 2 tablespoons olive oil
- 2 tablespoons fajita seasoning
- Juice of 1 lime
- Salt and pepper, to taste
- Tortillas, for serving
- Optional toppings: sour cream, guacamole, shredded cheese, salsa, etc.
Instructions
- In a large bowl, combine the sliced flank steak, bell peppers, onion, minced garlic, olive oil, fajita seasoning, lime juice, salt, and pepper. Toss to coat everything evenly.
- Heat a large skillet or grill pan over high heat. Once hot, add the steak and vegetable mixture to the pan. Spread it out evenly in a single layer.
- Cook for about 5-7 minutes, stirring occasionally, until the steak is cooked to your desired doneness and the vegetables are tender-crisp.
- Remove the skillet from the heat and let it rest for a few minutes.
- Warm up the tortillas in a separate pan or microwave according to package instructions.
- Serve the steak and vegetable mixture in warm tortillas. Add your favorite toppings such as sour cream, guacamole, shredded cheese, or salsa.
- Roll up the tortillas, and enjoy the flavorful and quick steak fajitas!
One Pan Chicken And Veggies

Image and Recipe: Teal Notes
One pan chicken and veggies is a great way to make a quick dinner idea for two without too much hassle or ingredients. The secret is in seasoning your chicken and veggies with the right combination. Make sure and check out the recipe to learn how to create a quick chicken and veggie back perfect for two!
One Pan Chicken And Veggies
Ingredients
- 1 large onion, chunked
- 4 garlic cloves, peeled and smashed
- 1 cup broccoli florets
- 1 cup cauliflower florets
- 1 cup sweet potato, chopped
- 6 chicken thighs
- 2 tsp salt
- 2 tsp fresh rosemary
- 1 tsp pepper
- 2 tsp paprika
- 1 bunch of fresh parsley, chopped
- 4 tbsp butter, sliced
Instructions
- Preheat the oven to 425 degrees
- Cover a baking sheet with parchment paper
- Put the chicken thighs down first
- Arrange the broccoli, cauliflower, and sweet potato around the chicken thighs
- In a small bowl mix the salt, rosemary, pepper, and paprika together. Use your fingers to rub the rosemary and other spices together
- Sprinkle the veggies and thighs with the seasoning mixture
- Top with the chopped parsley
- Put a pat of butter on each of the chicken thighs
- Bake for 35-40 minutes or until the thighs reach an internal temp of 165 degrees fahrenheit
15 Minute Vegetable Lo Mein For Two
Hey, veggie lo mein is an option too! It goes great with some 5 minute orange chicken and satisfies the taste buds that crave some oriental goodness. It’s easy to put together, affordable, and only takes a few key ingredients.
Related: 39 Delicious Chicken Slow Cooker Recipes For Easy Dinners
Spinach Feta Turkey Burger

Via Teal Notes
Make some burgers that don’t involve expensive beef at all. Switch it up with some turkey instead. It’s a definitely healthy dinner idea for two and can be a very filling option that doesn’t involve too much kitchen time.
Discover The Irresistible Spinach Feta Turkey Burger
Ingredients
- 1 pound ground turkey
- 1 cup fresh spinach, finely chopped
- 1/2 cup crumbled feta cheese
- 1/4 cup breadcrumbs
- 1 clove garlic, minced
- 1 teaspoon dried oregano
- 1/2 teaspoon salt
- 1/4 teaspoon black pepper
- 4 burger buns
- Toppings of your choice (lettuce, tomato, onion, etc.)
Instructions
- Preheat your grill or stovetop grill pan to medium heat.
- In a large mixing bowl, combine the ground turkey, chopped spinach, crumbled feta cheese, breadcrumbs, minced garlic, dried oregano, salt, and black pepper. Mix well until all the ingredients are evenly incorporated.
- Divide the mixture into four equal portions and shape each portion into a patty.
- Place the turkey patties on the preheated grill or grill pan. Cook for about 4-5 minutes per side or until the burgers are cooked through and reach an internal temperature of 165°F (74°C).
- While the burgers are cooking, lightly toast the burger buns.
- Once the burgers are cooked, remove them from the grill and let them rest for a few minutes.
- Assemble the burgers by placing each patty on a toasted bun. Add your desired toppings such as lettuce, tomato, onion, or any condiments of your choice.
- Serve the Spinach Feta Turkey Burgers while they're still warm and enjoy!
Roast Turkey Thighs For Two
Piggy backing off the turkey idea why not try some turkey thighs for two? Pair it with some sauteed veggies and some white rice and you’ve got yourself a winning dinner for two.

Stuffed Pizza Waffles

Via Teal Notes
When you set your eyes on these pizza waffles, your mouth simply starts watering. I mean look at them? The softness of the waffles goes great with all your favorite pizza toppings. A mess free dinner idea for two. I only wish I would have come up with that idea!
Stuffed Pizza Waffles (A Delicious Twist To Your Pizza Cravings)
Ingredients
- 2 cups all-purpose flour
- 1 tablespoon baking powder
- 1/2 teaspoon salt
- 1 1/2 cups milk
- 2 eggs
- 1/4 cup vegetable oil
- 1 cup shredded mozzarella cheese
- 1/2 cup mini pepperoni slices
- 1/2 cup pizza sauce
- Optional toppings: sliced olives, diced bell peppers, cooked sausage, etc.
Instructions
- Preheat your waffle iron according to the manufacturer's instructions.
- In a large mixing bowl, whisk together the flour, baking powder, and salt.
- In a separate bowl, whisk together the milk, eggs, and vegetable oil.
- Pour the wet ingredients into the dry ingredients and stir until just combined. Be careful not to overmix; a few lumps are fine.
- Preheat your oven to a low temperature (around 200°F or 93°C) to keep the waffles warm while cooking the remaining batches.
- Grease the waffle iron with cooking spray or brush with melted butter.
- Spoon a portion of the waffle batter onto the waffle iron, spreading it evenly. Be careful not to overfill, as the batter will expand.
- Sprinkle shredded mozzarella cheese and mini pepperoni slices over the batter.
- Spoon a small amount of pizza sauce over the toppings.
- Top with any optional toppings of your choice.
- Carefully close the waffle iron and cook the waffle according to your iron's instructions, usually for about 3-5 minutes, or until golden and crisp.
- Carefully remove the stuffed pizza waffle from the iron and place it on a baking sheet in the preheated oven to keep warm while you cook the remaining waffles.
- Repeat the process with the remaining batter and toppings.
- Serve the Stuffed Pizza Waffles warm as a delicious and fun meal or snack option.
Easy Chicken And Dumplings Recipe For Two
Dumplings! Everybody loves dumplings! Especially when they’re made with love for an evening dinner idea. They’re pretty perfect for a cold day in, or when you aren’t feeling so well. It’s for sure a dinner idea to have in your arsenal. Check out the full recipe over at Zona Cooks.
Seven Layer Tostadas For Two
Via Teal Notes
Tostadas are some of the easiest and lesser known dinner ideas out there. They cost very little to make, are mess free, and can be a nice light dinner to share with another. All you basically have to do is get your favorite toppings together and layer them on some store bought tostadas to your liking. Pretty darn easy dinner for two.
A Flavorful Journey with Seven-Layer Tostadas for Two
Ingredients
- 4 tostada shells
- 1 cup refried beans
- 1 avocado, mashed
- 1/2 cup sour cream
- 1/2 cup salsa
- 1/2 cup shredded lettuce
- 1/2 cup diced tomatoes
- 1/4 cup sliced black olives
- 1/4 cup shredded cheddar cheese
- Fresh cilantro, for garnish (optional)
- Lime wedges, for serving
Instructions
- Spread a layer of refried beans evenly on each tostada shell.
- Spread a layer of mashed avocado on top of the beans.
- Drizzle sour cream and salsa over the avocado layer.
- Sprinkle shredded lettuce, diced tomatoes, sliced black olives, and shredded cheddar cheese over the sour cream and salsa layer.
- Garnish with fresh cilantro, if desired.
- Serve the Seven-Layer Tostadas with lime wedges on the side for squeezing over the tostadas.
- Enjoy this delicious and satisfying meal for two!
Chicken Scallopini

If all else fails, chicken never does. And this chicken scallopini recipe looks like it could come to your rescue for dinner time. Easy to make and pretty tasty. It’s definitely set up as an ‘undisappointing’ dinner plate.
Crispy Shrimp And Scallop Rolls
Via Teal Notes
Try some rolls as a dinner for two! While its not the conventional homemade dinner you’d think about at first, once you learn to make these babies, you can mix and match and fill them with your favorite ingredients for a satisfying meal. Check out the full recipe at Garden And Table.
Crispy Shrimp And Scallop Rolls (Seafood Bliss Rolled In Every Bite)
Ingredients
- 8 large shrimp, peeled and deveined
- 8 scallops
- 8 spring roll wrappers
- 1 cup shredded cabbage
- 1 carrot, julienned
- 2 green onions, thinly sliced
- 2 tablespoons soy sauce
- 1 tablespoon oyster sauce
- 1 teaspoon sesame oil
- 1/2 teaspoon garlic powder
- 1/2 teaspoon ginger powder
- Vegetable oil, for frying
- Sweet chili sauce, for dipping
Instructions
- In a bowl, combine the soy sauce, oyster sauce, sesame oil, garlic powder, and ginger powder. Mix well.
- Place the shrimp and scallops in the marinade and let them sit for about 10 minutes to absorb the flavors.
- Heat vegetable oil in a deep pan or skillet over medium-high heat for frying.
- Take a spring roll wrapper and place it on a clean surface. Arrange a small amount of shredded cabbage, julienned carrot, and sliced green onions in the center of the wrapper.
- Remove the shrimp and scallops from the marinade, reserving the marinade for later use.
- Place a shrimp and scallop on top of the vegetable mixture in the wrapper.
- Fold the bottom of the wrapper over the filling, then fold the sides inward and roll tightly to form a spring roll shape. Use a bit of water to seal the edges if needed.
- Repeat the process with the remaining ingredients.
- Carefully place the rolls in the hot oil and fry until golden brown and crispy, turning occasionally for even cooking. This usually takes about 3-4 minutes.
- Remove the rolls from the oil and let them drain on a paper towel-lined plate.
- In a small saucepan, heat the reserved marinade over medium heat until it thickens slightly.
- Serve the crispy shrimp and scallop rolls with the sweet chili sauce for dipping.
- Enjoy these delicious and crunchy rolls as an appetizer or as part of a meal!
Sheet Pan Hawaiian Chicken
Chicken is good, Hawaiian chicken, that’s even better. And its not a hard recipe at all, you just need a little motivation and a few pans. Learn the complete recipe and make it a weekly favorite.
Bacon Wrapped Cream Cheese Chicken Roll Ups
Via Teal Notes
Chicken roll ups make great tasty bites to eat for dinner. You can eat them alone for a meat heavy fest or pair them with something else, like pastas or even a simple wild rice pan.
Elevate Your Meals With Bacon Wrapped Cream Cheese Chicken Roll Ups
Ingredients
- 4 boneless, skinless chicken breasts
- 8 ounces cream cheese, softened
- 1 teaspoon garlic powder
- 1 teaspoon onion powder
- 1/2 teaspoon paprika
- Salt and pepper, to taste
- 8 slices of bacon
- Toothpicks
Instructions
- Preheat your oven to 400°F (200°C) and lightly grease a baking dish.
- In a mixing bowl, combine the softened cream cheese, garlic powder, onion powder, paprika, salt, and pepper. Mix well until all the ingredients are fully incorporated.
- Place the chicken breasts between two sheets of plastic wrap and pound them gently to flatten them to an even thickness.
- Spread a generous layer of the cream cheese mixture onto each chicken breast.
- Starting from one end, roll up each chicken breast tightly and wrap two slices of bacon around each roll-up, securing it with toothpicks to hold everything in place.
- Place the bacon-wrapped chicken roll-ups in the greased baking dish.
- Bake in the preheated oven for 25-30 minutes or until the chicken is cooked through and the bacon is crispy.
- Remove from the oven and let the chicken rest for a few minutes before removing the toothpicks.
- Serve the Bacon Wrapped Cream Cheese Chicken Roll-Ups hot as a main course or slice them into bite-sized pieces for appetizers.
Steak Burrito Bowl
If you’re looking for a filling dinner recipe, then look no further than this steak bowl for two! It is super easy to put together and can always be stored away for later if there is anything you don’t end up eating.
Steak Burrito Bowl
Ingredients
- 1.5 pounds of ribeye steak
- Juice of 2 limes
- 4 cloves of garlic, minced
- 2 tablespoons soy sauce
- 1 teaspoon cumin
- Salt and pepper to taste
- 2 cups cooked white rice
- 1 tablespoon chopped fresh cilantro
- 1 cup sautéed bell peppers and onions
- 2 cups shredded lettuce or greens
- 1 cup sliced tomatoes
- ½ cup thinly sliced red onions
- 1 ripe avocado, sliced
- ½ cup salsa or pico de gallo
- ½ cup sour cream or Greek yogurt
- ½ cup shredded cheese (optional)
- Fresh cilantro leaves for garnish
Instructions
- In a bowl, combine the lime juice, minced garlic, soy sauce, cumin, salt, and pepper to create a marinade.
- Place the ribeye steak in a shallow dish and pour the marinade over it. Make sure both sides are coated.
- Let the steak marinate for at least 20 minutes to allow the flavors to penetrate.
- Heat a grill or grill pan over medium-high heat. Then remove the steak from the marinade and pat it dry with a paper towel to promote a good sear.
- Grill the steak for about 4-5 minutes per side for medium-rare, or adjust the cooking time according to your preference.
- Remove the steak from the grill and let it rest for a few minutes. Slice it thinly against the grain.
- For the base, divide the cooked rice among four bowls, creating a base.
- Top the rice with sautéed bell peppers and onions. And arrange the sliced steak on top of the veggies, creating a centerpiece.
- Add shredded lettuce or greens, sliced tomatoes, red onions, and avocado slices to the bowl.
- Spoon salsa or pico de gallo and dollop sour cream or Greek yogurt in the bowl. If desired, sprinkle shredded cheese over the top. And garnish with fresh cilantro leaves.
- Serve the Steak Burrito Bowls immediately and savor the delicious flavors.
Easy Fish Tacos For Two
Via Teal Notes
Fish tacos! Bet you hadn’t thought of those as an easy meal idea for two! As soon as you season and fry the fish, all you have to do is warm up some tortillas and some toppings to go along with it.
Dive Into Flavor With Easy Fish Tacos For Two
Ingredients
- 2 white fish fillets (such as tilapia or cod)
- 1 tablespoon olive oil
- 1 teaspoon chili powder
- 1/2 teaspoon ground cumin
- 1/2 teaspoon paprika
- Salt and pepper to taste
- 4 small flour tortillas
- 1/2 cup shredded cabbage
- 1/4 cup diced tomatoes
- 1/4 cup diced red onion
- 2 tablespoons chopped fresh cilantro
- 2 tablespoons mayonnaise
- 1 tablespoons lime juice
- Lime wedges (for serving)
Instructions
- Preheat your oven to 400°F (200°C).
- Place the fish fillets on a baking sheet lined with parchment paper. Drizzle the fillets with olive oil and sprinkle them with chili powder, cumin, paprika, salt, and pepper. Rub the spices onto both sides of the fish.
- Bake the fish in the preheated oven for 12-15 minutes or until it is cooked through and flakes easily with a fork.
- While the fish is baking, warm the flour tortillas in a dry skillet over medium heat for about 1 minute on each side until they are soft and pliable. Remove them from the skillet and set them aside.
- In a small bowl, mix together the mayonnaise and lime juice to create a creamy lime sauce.
- Once the fish is cooked, remove it from the oven and allow it to cool slightly. Use a fork to flake the fish into bite-sized pieces.
- To assemble the tacos, place a spoonful of the flaked fish onto each tortilla. Top with shredded cabbage, diced tomatoes, diced red onion, and chopped cilantro. Drizzle the creamy lime sauce over the toppings.
- Serve the fish tacos with lime wedges on the side for squeezing over the tacos.
- Enjoy your easy and delicious fish tacos for two!
Bean Soup For Two

Hmmm bean soup! It’s a great vegan dish if you’re looking to get all your nutrition and have something tasty for dinner at the same time. While a legume soup might not be what first comes to mind when it comes to dinner ideas, it can actually be a great alternative to the usual rice and meat combo. Top off with your favorite garnish and you’re ready to go.
5 Ingredient Grilled Chicken
Via Teal Notes
Grilled chicken coudn’t not make the list of easy dinner ideas for two. Five ingredient chicken can taste better than most things you make during the week if you get the recipe over at Fuss Free Cooking. It’s all in the blend of spices.
5 Ingredient Grilled Chicken (Easy, Flavorful, and Delicious!)
Ingredients
- 4 boneless, skinless chicken breasts
- 1/4 cup olive oil
- 2 tablespoons lemon juice
- 2 cloves garlic, minced
- 1 teaspoon dried herbs (such as Italian seasoning or your preferred blend)
- Salt and pepper, to taste
Instructions
- Preheat your grill to medium-high heat.
- In a bowl, whisk together the olive oil, lemon juice, minced garlic, dried herbs, salt, and pepper.
- Place the chicken breasts in a shallow dish or zip-top bag and pour the marinade over them. Make sure the chicken is well coated. Allow it to marinate in the refrigerator for at least 30 minutes, or up to 4 hours for more flavor.
- Remove the chicken from the marinade, letting any excess drip off.
- Grill the chicken breasts for about 6-8 minutes per side, or until they reach an internal temperature of 165°F (74°C) and are no longer pink in the center. Cooking time may vary depending on the thickness of the chicken breasts.
- Once cooked, remove the chicken from the grill and let it rest for a few minutes before serving.
- Slice or serve the grilled chicken breasts as desired and enjoy!
Easy Buffalo Chicken Bake For Two
Buffalo Chicken is a must for your weekday dinner recipe ideas. It doesn’t take long to put together and stick in the oven for a tasty dinner idea for both of you.
Pan Seared Scallops With Fennel For Two
Via Teal Notes
If you’re feeling seafood for dinner then this dinner idea for two is just for you! Scallops and delicious, no questions asked. But when you pan sear them with some noodles and some bacon, you get a yummy recipe for everyone involved.
Savor Romance With Pan-Seared Scallops With Fennel For Two Savor Romance With Pan-Seared Scallops With Fennel For Two
Ingredients
- 8-10 large sea scallops
- 1 medium fennel bulb, thinly sliced
- 2 tablespoons olive oil
- 2 tablespoons butter
- 2 cloves garlic, minced
- 1/2 teaspoon lemon zest
- Salt and pepper to taste
- Fresh parsley, chopped (for garnish)
- Lemon wedges (for serving)
Instructions
- Start by preparing the scallops. Pat them dry with paper towels to remove any excess moisture. Season both sides of the scallops with salt and pepper.
- Heat a large skillet over medium-high heat. Add olive oil and butter to the skillet, allowing the butter to melt and start bubbling.
- Carefully place the scallops into the skillet, making sure they are not overcrowded. Cook the scallops for about 2-3 minutes on each side until they develop a golden brown crust. Avoid moving them around too much to achieve a good sear. Remove the scallops from the skillet and set them aside on a plate.
- In the same skillet, add the minced garlic and sliced fennel. Sauté them over medium heat until the fennel softens and caramelizes slightly, for about 5-7 minutes.
- Return the scallops to the skillet, nestling them among the fennel. Add the lemon zest and give everything a gentle toss to combine. Cook for another 1-2 minutes to warm the scallops through.
- Taste the dish and adjust the seasoning with salt and pepper if needed.
- Serve the pan-seared scallops with fennel on a plate, garnished with fresh parsley. Accompany the dish with lemon wedges for squeezing over the scallops, if desired.
- Enjoy your delicious pan-seared scallops with fennel!
Spinach Lasagna Roll-Ups

Lasagna only looks hard to make but it can actually not be too bad to put together. These rolls are the perfect bite size for when you only want to cook for two and not have too much leftover.
Caramelized Pork Ramen Noodle Soup
Via Teal Notes
Ramen noodle recipes aren’t only for dorm dwellers. They can make a great dinner idea for two if you learn how to dress it with the right ingredients. This one includes pork and egg, Jalapenos and carrots. A pretty tasty and smart creation for two that can be ready in no time.
Caramelized Pork Ramen Noodle Soup (Deliciously Savory Recipe)
Ingredients
- 2 tablespoons vegetable oil
- 8 ounces pork belly, sliced
- 2 cloves garlic, minced
- 1 small onion, thinly sliced
- 1 carrot, julienned
- 4 cups chicken broth
- 2 tablespoons soy sauce
- 1 tablespoon brown sugar
- 2 packages ramen noodle
- 2 cups baby spinach
- 2 soft-boiled eggs, halved
- Sliced green onions, for garnish
- Nori sheets, for garnish
- sesame seeds, for garnish
Instructions
- Heat the vegetable oil in a large pot over medium heat. Add the sliced pork belly and cook until browned and caramelized, about 5-7 minutes. Remove the pork from the pot and set aside.
- In the same pot, add the minced garlic, sliced onion, and julienned carrot. Sauté until the vegetables are softened, about 3-4 minutes.
- Pour in the chicken broth, soy sauce, mirin, and brown sugar. Stir well to combine and bring the mixture to a simmer. Let it simmer for about 10 minutes to allow the flavors to meld together.
- While the broth is simmering, cook the ramen noodles according to the package instructions. Drain and set aside.
- Add the cooked pork belly back into the pot with the broth. Stir in the baby spinach and let it wilt for a minute.
- To serve, divide the cooked ramen noodles between bowls. Ladle the caramelized pork and vegetable broth over the noodles. Top with halved soft-boiled eggs, sliced green onions, nori sheets, and a sprinkle of sesame seeds.
Creamy Veggie Soup For Two
Sometimes you need a heart warming soup to end your day, so why not try a nice and healthy creamy veggie soup? You can easily make it with a crock pot and you don’t have to use that many ingredients for it to taste good! On top of that its super cheap to make!
Salmon Quesadillas
Via Teal Notes
Try a different version of quesadillas with Salmon Quesadillas. Yes you can fill them with red meat or chicken, or you can go the healthier route and try fish. It’s basically a fish taco in quesadilla form. Pretty clever and great idea for two hungry people!
Irresistible Salmon Quesadillas (A Flavorful Delight that Transforms Meals)
Ingredients
- 4 large flour tortillas
- 1 can of cooked salmon, drained
- 1/2 cup of chopped red onion
- 1/2 cup of chopped red bell pepper
- 1/2 cup of chopped fresh cilantro
- 1 cup of shredded cheddar cheese
- Salt and black pepper to taste
- Olive oil for frying
Instructions
- Begin by heating a large skillet or griddle over medium heat. You want it to be hot enough to create a golden crust on the tortillas without burning them.
- Place one tortilla on a clean surface or plate. Sprinkle a generous amount of the shredded cheese evenly over the tortilla. Next, add a portion of the seasoned salmon pieces and a handful of the prepared vegetables.
- Carefully transfer the assembled quesadilla to the preheated skillet. Cook it for about 2-3 minutes on each side, or until the tortilla turns golden brown and the cheese melts to a gooey perfection.
- Continue assembling and cooking the remaining quesadillas in the same manner. As each quesadilla is done, transfer it to a baking sheet and keep it warm in a preheated oven set to a low temperature.
- Once all the quesadillas are cooked, remove them from the oven and let them cool slightly. Arrange them on a platter and garnish with additional fresh herbs, a squeeze of lime juice, or a dollop of sour cream, if desired. Serve them warm and enjoy!
Slow Cooker Beef And Broccoli
I mean who doesn’t love some beef and broccoli. You combine that with your slow cooker and you can make just about the best meal of the week. No need to order greasy take out. Just make a healthier dinner for two right at home!
Crock Pot Tater Tot Egg Bake
Via Teal Notes
Here’s a little idea: Try some breakfast for dinner and make some tater tot egg bake for two. It’s a great easy idea for when you don’t want to get too involved making dinner, especially because you’ll likely already have all the ingredients you need.
Crock Pot Tater Tot Egg Bake Recipe (Master Meal Prep for Effortless Mornings)
Ingredients
- 1 package (32 ounces) frozen tater tots
- 8 eggs
- 1 cup milk
- 1 cup shredded cheddar cheese
- 1/2 cup diced bell peppers
- 1/2 cup diced onions
- 1/2 cup diced cooked bacon or ham
- Salt and pepper to taste
- Cooking spray
Instructions
- Start by greasing your crock pot with cooking spray to prevent sticking.
- In a separate bowl, crack the eggs and whisk them until they're well beaten. Add milk, a pinch of salt, and a sprinkle of pepper to the bowl.
- Carefully pour the egg mixture over the tater tots and cheese in the crock pot.
- Cover the crock pot and let it work its magic, transforming the ingredients into a heavenly dish.
- Crumble some cooked bacon or sausage over the surface, sprinkle diced bell peppers and onions for a burst of flavor, and let them meld together with the eggs and cheese.
Steak Nachos For Two

Steak nachos are great! Steak nachos are tasty! Steak nachos are a perfect dinner idea for two! Try the recipe over at Home Sweet Eats!
Slow Cooker Pasta Fagioli
Via Teal Notes
Try some slow cooker pasta with legumes. It can make for a nice hearty meal that you’ll both appreciate and that won’t take take up too much of your time to make at all (that’s the beauty of a crock pot recipe).
Slow Cooker Pasta Fagioli (A Delicious and Nutritious Meal for Busy Days)
Ingredients
- 1 tablespoon olive oil
- 1 medium onion, diced
- 2 cloves garlic, minced
- 2 carrots, diced
- 2 celery stalks, diced
- 1 can (14.5 ounces) diced tomatoes
- 1 can (15 ounces) kidney beans, drained and rinsed
- 1 can (15 ounces) white beans, drained and rinsed
- 4 cups vegetable broth
- 1 teaspoon dried oregano
- 1 teaspoon dried basil
- 1/2 teaspoon dried thyme
- 1/2 cup ditalini or small pasta of your choice
- Salt and pepper to taste
- Grated parmesan cheese, for serving
- Fresh parsley, chopped, for garnish (optional)
Instructions
- Start by browning the ground beef or turkey in a skillet over medium heat.
- In the same skillet, add the diced onions, minced garlic, and chopped celery. Sauté them until they turn fragrant and start to soften, which usually takes around 3-4 minutes.
- Give them a good stir and cook them for about 5 minutes until they begin to soften. The carrots will add a touch of sweetness and vibrant color to the soup.
- Transfer the cooked ground beef or turkey, sautéed vegetables, kidney beans, cannellini beans, diced tomatoes (with their juices), tomato sauce, and broth into the slow cooker. Stir everything together to ensure all the ingredients are well combined.
- To infuse the soup with Italian flavors, add the Italian seasoning and bay leaves to the slow cooker.
- Cover the slow cooker with its lid and set it to cook on low heat for 6-8 hours or on high heat for 3-4 hours.
- About an hour before the cooking time is up, stir in the pasta of your choice. This will allow the pasta to cook until al dente, absorbing the flavors of the soup without becoming mushy. Once the pasta is cooked to perfection, your slow cooker pasta fagioli is ready to be enjoyed.
Slow Cooker Maple Chicken Stew
Dinner for two can be made easy with an easy crock pot recipe that you basically dump and forget until its ready. This maple chicken stew is perfect for that and can be a great way to start using that crock pot that’s just sitting there gathering dust.
Try These Dinner Ideas For Two
Sometimes we just don’t want to cook up a storm and have a ton of food leftover. Sometimes we just want a nice and tasty, quick and easy dinner for two that won’t break the bank but that will still satisfy your cravings. Depending on if you want leftovers or not, you can always use measurement conversions to create smaller portions of things.
It’s always a good idea to have a list of recipes you can pick from, and this handy list can definitely be a start. Try out a recipe and see how it goes. Make sure you share any that you think might be a great addition below!
Dinner Ideas For Two
Instructions
- Find your favorite dinner idea, click on the link for the recipe, and a delicious meal for tonight.

Looking for more money saving meal ideas and recipes? Here is a roundup of the best food related posts:
39 Delicious Crock Pot Chicken Recipes For Easy Dinners
Best Flan Recipe: How To Make Mexican Flan With This Easy Flan Recipe!
Cooking On A Budget: 13 Smart Ways To Save Money When You Cook
45 Healthy Snacks Ideas to Lose Weight and Satisfy Your Cravings
10 Healthy Smoothie Recipes to Super Charge Your Day
What is Yerba Mate? Why It’s The Drink That Perfectly Replaces Your Coffee Addiction
The Beginner’s Guide to Meal Prep
23 Easy Meal Prep Ideas For When You Don’t Know What To Make
How To Make The Best Hot Chocolate: The Best Hot Chocolate Recipe With Cocoa Powder
Weekly Meal Plan: What To Make For Dinner Tonight And This Week
Authentic Guacamole Recipe- How To Make An Easy & Delicious Guacamole Dip
Spaghetti Carbonara is a creamy, comforting Italian classic with the perfect balance of pancetta, eggs, cheese, and pasta.
Yummy Recipes are a culinary delight! These delectable dishes offer a taste adventure, satisfying cravings and tantalizing taste buds. A treasure trove of flavor!
Spaghetti Carbonara is Italian comfort on a plate! Creamy, savory, and rich with crispy bacon. A timeless classic that’s quick to make and full of flavor.
Pork Carnitas Tacos are pure taco heaven! Juicy, flavorful pork, crispy edges, and all the fixings in a warm tortilla. These tacos are an absolute fiesta for your taste buds
Thank you for the useful and interesting information. The list is quite large.
I like it
I love bell pepper pizza. Thanks for the list of the recipes.
Hi Marianna, the image is a stock image, so the post doesn’t have the recipe for it. But yes, what you described sounds about right 🙂
I didn’t find a recipe for the thumbnail picture (picture at the top with potato’s) do you think with your best guess, that it is paired with guacamole and a thick chili?